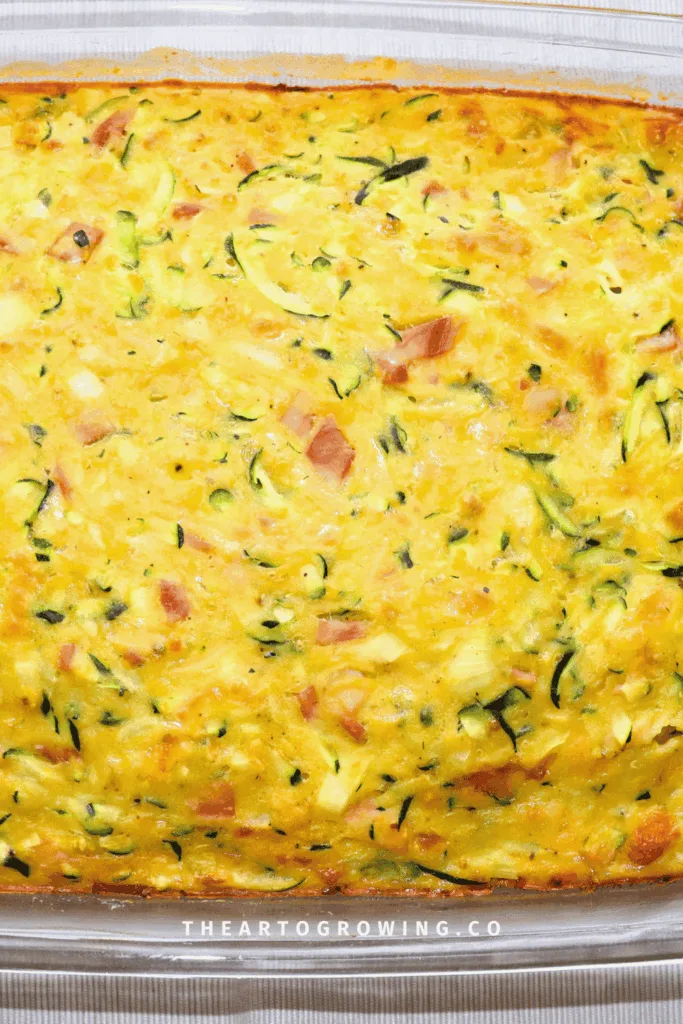
Easy Zucchini Slice with Bacon and Creamed Corn
This post contains affiliate links. As an Amazon Associate, I earn from qualifying purchases. Read my full disclosure here.

Easy Zucchini Slice with Bacon and Creamed Corn – This delicious and super easy recipe is homemade! Made with grated zucchini, cheese, bacon, onion, and creamed corn, nestled delightfully in an egg bake. It’s a one-bowl wonder that can be frozen or served at your next Aussie BBQ!
It’s also great for eating hot or cold, making it the perfect lunchbox addition. You can serve this for a light lunch or even dinner with a simple side salad. It’s THAT versatile!
pin it for later 📌

I enjoy whipping up a quick batch of zucchini slices to include in my weekly summer meals. My zucchini plants produce a crazy amount of fruit between December and February, so I’m always coming up with new ways to add zucchini to our meals.
This recipe is a little different from the Aussie classic, and it’s partly because when I was making this recipe, I thought I’d kill two birds with one stone and use a can of creamed corn that had been collecting dust in the back of my pantry! Don’t worry, the can was within date, ha-ha!
Zucchini Slice Ingredients

- Zucchini – my main man! I like to pick my zucchini when they’re medium to large-sized (15-20cm long), they should be dark green in colour and firm to the touch. If you’re like me and forget you have a few growing and they’re Godzilla-sized, you can cut them in half and scoop out the seeds. With this recipe, it’s a good idea to drain the excess water and be sure to weigh them afterward, as adding too much will make your slice soggy.
- Bacon – I use eye bacon, but you can use whichever cut takes your fancy. You can even use pre-cut bacon pieces or chopped ham. For a vegetarian zucchini slice, add some chopped asparagus, beans, capsicum (for my American friends, bell pepper), or sun-dried tomatoes.
- Creamed or Sweetcorn – because I was cleaning out my pantry, I went for a can of creamed corn. It looks a little weird, but the taste is amazing! If yellow baby vomit isn’t your thing (I bet that’s all you can imagine now, huh?!), you can freshly shuck an ear of corn or use corn kernels.
- Eggs – used to bind the mixture. Use large eggs at room temperature. Bonus points if these bum-berries are from your backyard hens.
- Self-raising flour – gives your slice that subtle sponge-like texture and adds some volume. Gluten-free flour can be used if required. If you don’t have self-raising flour, you can make your own by mixing 1 teaspoon of baking powder into every 100 grams of plain flour. You can use wholemeal or white flour; there is very little to no difference in taste.
- Cheese – I use a mix of 3 cheeses: Mozzarella, Romano, and Cheddar cheese. You can use any other type of hard cheese combo, like Colby or Parmesan cheese, for extra flavour. Grating your cheese will melt better than pre-packaged shredded cheese.
- Olive oil – for moisture and flavour. Choose a light, mild-tasting olive oil, or any other mild oil.
- Salt and black pepper – because life is boring without these two powerhouses!
Optional Ingredients
- Spring onions – throw them over the top as a little garnish to complete the meal.
- Tomatoes – slice thinly and place on top just before you bake your slice
Equipment
- Box Grater
- Large Mixing Bowl
- Spatula
- Baking Dish
- Baking Mat / Parchment Paper (Optional)
- Large Skillet (Optional)
Zucchini Slice Instructions
Step 1: Combine all of your ingredients into a large bowl. If you’d like to fry off your onion and bacon, do this first.

Step 2: Add your batter into a lined or well-oiled baking dish and bake for 35 – 40 minutes or until golden brown on top.

Step 3: Use a toothpick to check your slice has completely cooked through. The toothpick should come out clean. Store in an airtight container in the fridge for a week or up to 3 months in the freezer.

Helpful Tips / Notes
- For this recipe, I added the bacon uncooked, directly to the batter. If I have time, I will cook the bacon and onion in a pan before adding it to the mixture. Both versions taste great, but the fried bacon does add extra flavour and a crunchy texture.
- Be sure to weigh and measure the ingredients to prevent that dreaded mushy slice.
- Garnish with your favourite fresh herbs to give it an extra kick of flavour.
- For zucchini muffins, divide the mixture into muffin trays instead. The cooking times will vary, depending on the size of your muffin tray.
- Don’t forget the toothpick method to ensure your slices or muffins are completely cooked through.
- For best results, leave the slice to cool in the baking dish for around 15 minutes before attempting to cut it into individual slices. Otherwise, it may fall apart.
- This recipe is meal prep and freezer-friendly! Divide into individual portions and freeze for up to 3 months.
This simple and easy Zucchini Slice with Bacon and Creamed Corn is a staple in my home and one that my whole family enjoys, especially in the summer months. I hope your family enjoys it just as much as mine does!
Related Posts
- Pork Pasta with Broccoli & Tomato | 30 Minute Meal
- Pad Kra Pao
- The BEST Homemade Pasta Recipe
- Easy Stuffed Zucchini Boats with Nduja & Ricotta
Find me on socials 👇🏼
Join the community 🏡
If you love simple, seasonal living, join my weekly email for gardening tips, old skills, and from‑scratch home inspiration.

EASY ZUCCHINI SLICE WITH BACON AND CREAMED CORN
This delicious and super easy recipe is homemade! Made with grated zucchini, cheese, bacon, onion, and creamed corn nestled in amongst an egg bake. It’s a one-bowl wonder that can be frozen or taken to your next Aussie BBQ!
Ingredients
- 2 medium zucchini's (400g), grated
- 250g bacon, diced
- 420g can of creamed corn, or corn kernals
- 5-6 large eggs, free-range is best
- 1 medium onion, diced
- 300g self-raising flour
- 1 cup cheese, shredded (cheddar, mozzarella and romano)
- 1/4 cup olive oil
- Salt and Pepper to taste
- Spring onions, chopped (optional garnish)
Instructions
- Preheat oven to 180 °C (356 F). Line a baking dish (22.5cm x 33cm) with baking paper or cover the surface with olive oil.
- (Optional) Heat a large skillet on medium to high heat and fry the onion and bacon for 5-6 minutes.
- Combine all your ingredients in a large bowl.
- Add your batter into a lined or well-oiled baking dish and bake for 35 – 40 minutes or until golden brown on top. Use a toothpick to check your slice is cooked through. The toothpick should come out clean.
- Store in an airtight container in the fridge for a week or up to 3 months in the freezer.
Notes
- Be sure to weigh and measure the ingredients, to prevent that dreaded mushy slice.
- For zucchini muffins, divide the mixture into muffin trays instead. The cooking times will vary, depending on the size of your muffin tray.
- For best results, leave the slice to cool in the baking dish for around 15 minutes before attempting to cut it into individual slices. Otherwise, it may fall apart.
Nutrition Information:
Yield: 12 Serving Size: 1Amount Per Serving: Calories: 342Total Fat: 18gSaturated Fat: 6gTrans Fat: 0gUnsaturated Fat: 11gCholesterol: 123mgSodium: 864mgCarbohydrates: 29gFiber: 2gSugar: 3gProtein: 16g