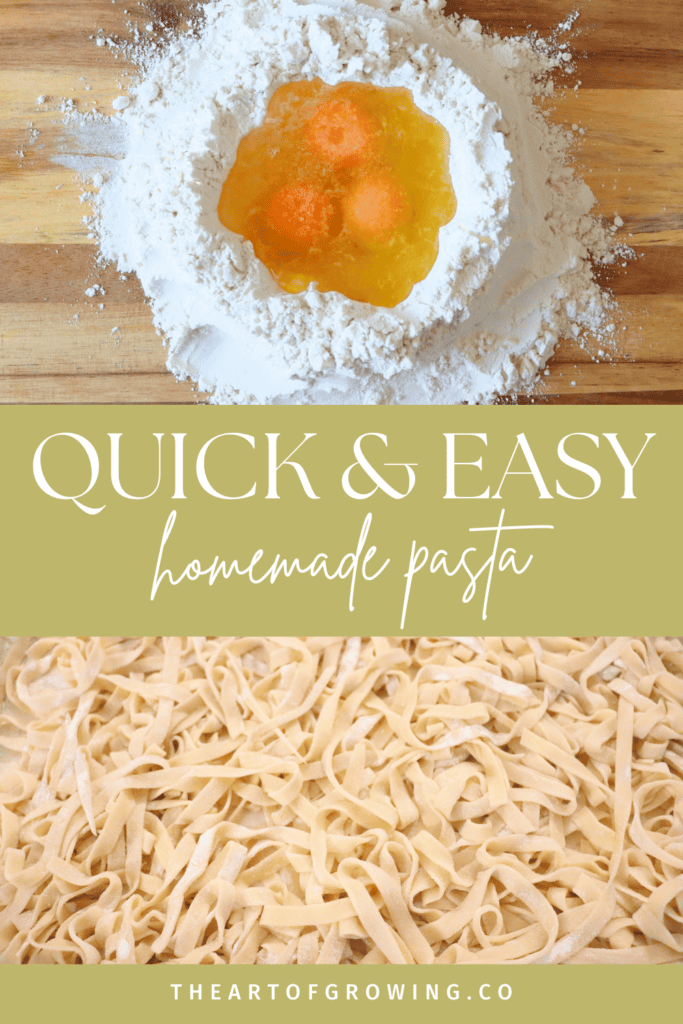
The BEST Homemade Pasta Recipe – Easy and Fresh!
This homemade pasta recipe is by far one of the best. It’s simple, tasty and requires minimal ingredients. It has become a staple weekly meal in our house and my daughter loves to join the pasta-making fun! I enjoy making fresh, wholesome food like sourdough bread and Pad Kra Poa but there’s something so satisfying about making this pasta. It reminds me of Pasta Grannies; watching Italian women making the simplest dishes in their villages. In this series, I gained the confidence to make pasta from scratch. These women were well into their 90s and still making homemade meals. Talk about homemaking #goals!
Now I am old school when it comes to kneading the dough: I use my hands and yes it can take a while but the reward at the end is worth all the achy muscles, and I feel I’m channelling my inner Pasta Granny! But don’t worry this recipe is also suited for using a stand mixer and will help you out of a bind when you’re short on time! The steps are simple and suited to either a pasta machine with a hand crank, a stand mixer with pasta attachment or a simple kitchen tool like a pizza cutter or a sharp knife..
pin it for later 📌
Why homemade pasta is better than store-bought:
- Quality Ingredients: When you make pasta from scratch, you have full control over the quality of ingredients used. You can choose organic, locally sourced eggs and flour, ensuring that your pasta is free from preservatives, additives, and artificial flavours commonly found in store-bought varieties.
- Freshness and Flavour: One of the most compelling reasons to make homemade pasta is the freshness and flavour it offers. Unlike store-bought pasta, which may sit on shelves for months before reaching your plate, homemade pasta is made fresh and consumed immediately, preserving the natural taste and aroma of the ingredients.
- Creativity: Making homemade pasta allows you to unleash your creativity in the kitchen. From traditional spaghetti and fettuccine to exotic shapes like ravioli and tortellini, the possibilities are endless. Experiment with different flavours and ingredients, such as spinach, herbs, or even squid ink, to create unique and flavorful pasta creations.
- Texture and Consistency: With a pasta maker, you can achieve a consistent thickness and texture that is difficult to replicate with store-bought pasta. Whether you prefer your pasta thin and delicate or thick and hearty, a pasta maker allows you to customise the thickness to suit your preferences, resulting in a perfect al dente bite every time.
So let’s get into it!
Equipment
- Measuring spoons
- Measuring cup
- Stand mixer (I use Kitchenaid) with dough hook
- Plastic wrap
- Rolling pin
- Pasta machine or Kitchenaid attachment (roller and cutter)
- Tray, floured baking sheet or cutting board
- Pizza cutter or sharp knife (for those who don’t have a pasta machine or Kitchenaid attachment)
- Bench scraper
- Pasta drying rack (optional)
Homemade Pasta Recipe
Ingredients
- All-purpose flour
- Whole Eggs
- Olive Oil
- Water
- Salt
Instructions
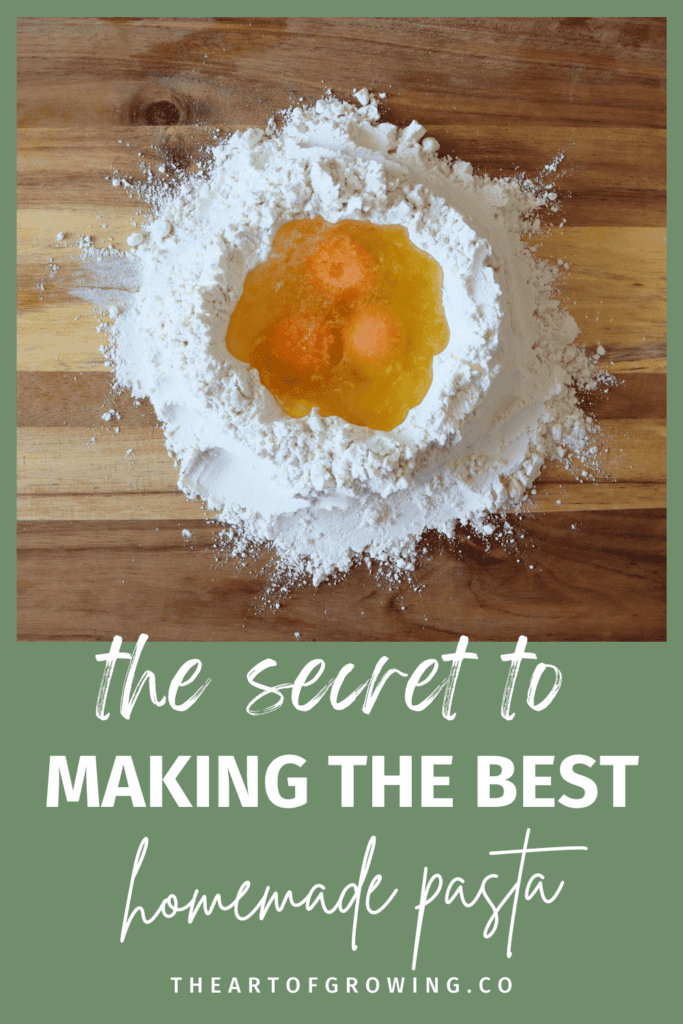
Mixing (by hand): on a clean work surface, arrange your all-purpose flour in the shape of a well. Crack your eggs into the center of the flour and with a fork begin whisking to break up the egg yolks. Add the oil, salt and water.
Mixing (stand mixer): add your all-purpose flour, eggs, oil, salt and water to your bowl.
Kneading: mix the ingredients until well combined for 10 – 15 minutes. It will start as a shaggy mess and then transform into a smooth, elastic dough. If you’re kneading with your hands, use the heel of your hand.
Resting: Turn the dough out onto your work surface and wrap it in plastic wrap. Let the dough rest at room temperature for a minimum of 15 minutes or a maximum of 2 hours. This allows the gluten to relax, making the dough easier to work with and preventing it from shrinking when rolled out.

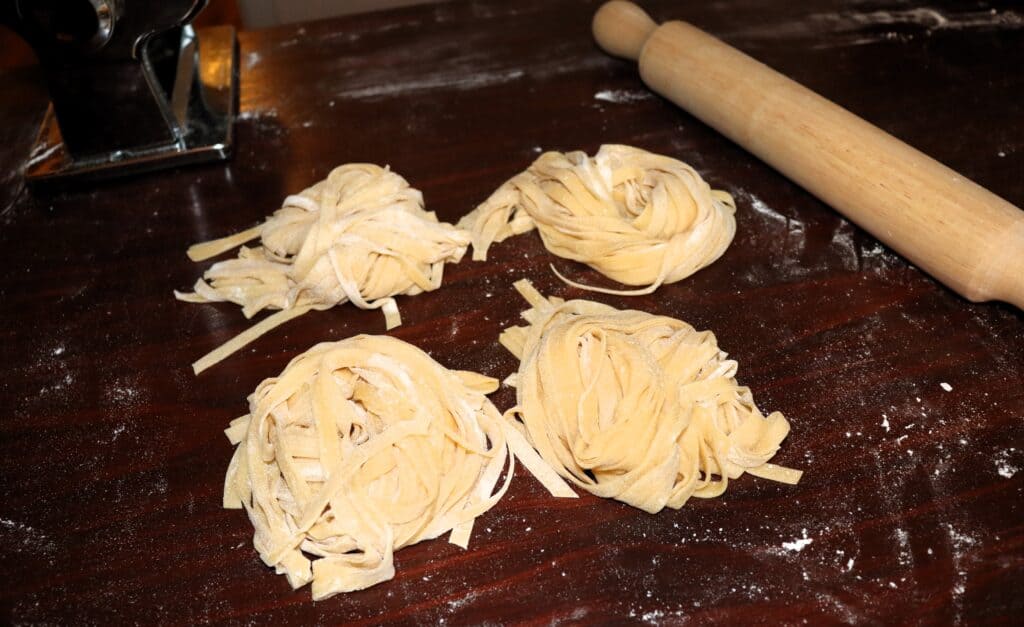
Rolling and Shaping: Once rested, divide the dough into 4 smaller portions and flatten each piece into a rough rectangle. Cover the rest of the dough so it doesn’t dry out. Lightly dust your first portion with flour.
Sprinkle a little flour on the tray and set it aside for later.
Set your pasta machine or pasta roller attachment onto the widest setting (usually no.1). Grab one piece of dough, feed it through the pasta maker, flip the pasta and then run it through again. Set your pasta maker at no.2 and repeat the process. It should now look like a rectangle (with curved edges).
If your sheet of pasta is an odd shape you can lay it on your work surface, fold the two ends into the middle (like closing a book) to create a smaller rectangle and then fold it in half. Run the pasta sheet back through your machine on no.2 twice more and gradually work up to no.6 or your desired thickness. Your passes will look like this:
- Setting 2 – two passes
- Setting 3 – two passes
- Setting 4 – two passes
- Setting 5 – two passes
- Setting 6 – two passes (optional)
Your pasta sheet will be quite thin and VERY long. Grab your tray and lay one end onto the floured surface, sprinkle some more flour over the top of your pasta sheet, spread it around with your fingers and then fold it over on itself. Continue to flour the surfaces and fold your pasta until it fits neatly within the tray or work surface.
Repeat the above steps with the remaining 3 dough pieces.
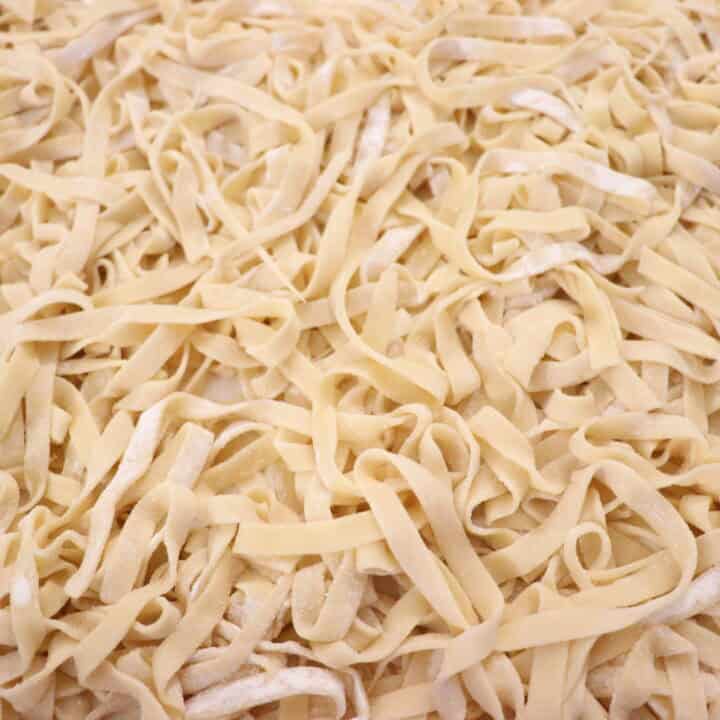
Cut the rolled dough into pasta of any kind; lasagne (150mm), fettuccine (6.5mm), or spaghetti (1.5mm) using the pasta maker’s cutter attachment or by hand with your pizza cutter or sharp knife. Place or sprinkle the cut pasta back onto the tray with some extra flour to stop it from sticking.
Leave your pasta to dry for a minimum of 30 minutes to ensure the flour has fully absorbed the water and egg ingredients. Optional: you can use a pasta drying rack however I find using a tray, clean surface or kitchen towel is fine.
Cooking: Bring a large pot of salted water to a boil and carefully add the fresh pasta. Cook for 2-3 minutes or until al dente. Fresh pasta cooks much faster than dried pasta, so be sure to keep an eye on it to avoid overcooking.
Strain your pasta and return to the pot, adding your favourite sauce. Add 2-3 tsp of olive oil to stop your pasta from sticking.
How to store fresh homemade pasta
Drying Pasta:
Drying your pasta offers the best long-term storage solution. If you’re making fresh pasta in large quantities and wish to store it for an extended period, drying it is ideal. This method saves refrigerator or freezer space and also maintains the pasta’s quality. Dried pasta doesn’t require refrigeration; instead, store it in an airtight container in a dry area away from extreme temperature or humidity.
How to dry homemade pasta:
- Toss your pasta with flour ensuring all areas are covered.
- Lay your pasta out on a drying rack, a baking tray or a clean kitchen towel to air dry.
- Aim for 18-24 hours of drying time however, this will depend largely on the temperature and humidity of your kitchen.
- Test your pasta every few hours. If it is ready, the pasta will snap in half when twisted, if it doesn’t, allow it to dry for a few more hours
- Store in an airtight container.
Freezing Pasta:
To keep pasta fresh for several months, use the freezer method. You should freeze the pasta even if you’re storing it for a day. Leaving it in the refrigerator for too long will cause the humidity to alter its flavour and texture and may provide a home for bacteria to grow. Freezing is a better option for pasta like gnocchi as it’s thicker.
How to Freeze Homemade Pasta:
- Toss your pasta with flour ensuring all areas are covered.
- Lay your pasta out on a drying rack, a baking tray or a clean kitchen towel to air dry for one hour.
- Store the semi-dried pasta in an airtight container in the freezer. You can use a freezer bag, or glass or plastic containers. Tip: remove the air from the freezer bag before freezing.
How to cook frozen pasta:
Take your frozen homemade pasta from the freezer and place it into a pot of salted boiling water. Thawing uncooked pasta can affect the texture and in some instances may fall apart.
Refrigerating Pasta:
Fresh pasta will last in the refrigerator for about one day, but it’s best enjoyed as fresh as possible. If plans change, you can store it in the freezer for longer-term storage as per the above instructions. Make sure this is done within one day of making it.
I hope you enjoyed this easy homemade pasta recipe. Making food from scratch is very close to my heart and why I created The Art of Growing. So whether this is your first time making pasta or you’re a Pasta Granny veteran, don’t be afraid to roll up those sleeves, blow the cobwebs off your pasta machine and make that pasta!
Looking for more recipes? Subscribe to my email list and follow me on Pinterest, Instagram and Facebook!
The BEST Homemade Pasta Recipe
This homemade pasta recipe is by far one of the best. It’s simple, tasty and requires minimal ingredients. Are you ready to get your Pasta Granny on?
Ingredients
- 2 cups all purpose flour
- 3 eggs
- 3 tsp extra virgin olive oil
- 1/2 tsp salt
- 3 tbsp water
Instructions
- Mixing by hand: on a clean work surface, arrange your all-purpose flour in the shape of a well. Crack your eggs into the center of the flour and with a fork begin whisking to break up the egg yolks. Add the oil, salt and water.
- Mixing with a stand mixer: add your all-purpose flour, eggs, oil, salt and water to your bowl. Turn your stand mixer to no. 2 setting
- Kneading: mix the ingredients until well combined for 10 – 15 minutes. It will start as a shaggy mess and then transform into a smooth, elastic dough. If you’re kneading with your hands, use the heel of your hand.
- Resting: Turn the dough out onto your work surface and wrap it in plastic wrap. Let the dough rest at room temperature for a minimum of 15 minutes or a maximum of 2 hours. This allows the gluten to relax, making the dough easier to work with and preventing it from shrinking when rolled out.
- Rolling and Shaping: Once rested, divide the dough into 4 smaller portions and flatten each piece into a rough rectangle. Cover the rest of the dough so it doesn’t dry out. Lightly dust your first portion with flour.
- Sprinkle a little flour on the tray and set it aside for later.
- Set your pasta machine or pasta roller attachment onto the widest setting (usually no.1). Grab one piece of dough, feed it through the pasta maker, flip the pasta and then run it through again. Set your pasta maker at no.2 and repeat the process. It should now look like a rectangle (with curved edges).
- Lay the sheet of pasta on your work surface, fold the two ends into the middle (like closing a book) to create a smaller rectangle and then fold it in half. Run the pasta sheet back through your machine at no.2 twice more and gradually work up to no.6 or your desired thickness. Make sure the pasta has gone through each setting twice.
- Your pasta sheet will be quite thin and VERY long. Grab your tray and lay one end onto the floured surface, sprinkle more flour over the top of your pasta sheet, spread it around with your fingers and then fold it over on itself. Continue to flour the surfaces and fold your pasta until it fits neatly within the tray or work surface.
- Repeat the above steps with the remaining 3 dough pieces.
- Cut the rolled dough into pasta of any kind; lasagne (150mm), fettuccine (6.5mm), or spaghetti (1.5mm) using the pasta maker’s cutter attachment or by hand with your pizza cutter or sharp knife. Place or sprinkle the cut pasta back onto the tray with some extra flour to stop it from sticking.
- Leave your pasta to dry for a minimum of 30 minutes to ensure the flour has fully absorbed the water and egg ingredients. Optional: you can use a pasta drying rack however I find using a tray, clean surface or kitchen towel is fine.
- Cooking: Bring a large pot of salted water to a boil and carefully add the fresh pasta. Cook for 2-3 minutes or until al dente. Fresh pasta cooks much faster than dried pasta, so be sure to keep an eye on it to avoid overcooking.
- Strain your pasta and return to the pot, adding your favourite sauce.
Notes
Add 2-3 tsp of olive oil to stop your pasta from sticking.
Nutrition Information:
Yield: 6 Serving Size: 1Amount Per Serving: Calories: 207Total Fat: 5gSaturated Fat: 1gTrans Fat: 0gUnsaturated Fat: 3gCholesterol: 93mgSodium: 230mgCarbohydrates: 32gFiber: 1gSugar: 0gProtein: 7g


Can you make the noodles and freeze them to use later then just take them out of the freezer and boil them?
Hi Carol,
Yes you can make your pasta and freeze it. Here’s the snippet from the blog post 🙂
How to Freeze Homemade Pasta: Toss your pasta with flour ensuring all areas are covered. Lay your pasta out on a drying rack, a baking tray or a clean kitchen towel to air dry for one hour. Store the semi-dried pasta in an airtight container in the freezer. You can use a freezer bag, or glass or plastic containers. Tip: remove the air from the freezer bag before freezing.
Let me know how it goes!
Best,
Mon
I LOVE homemade pasta! I haven’t tried drying it..thanks for the tips!
It’s so good isn’t it?! Drying is good for meal or batch prepping 😀 enjoy
Best,
Mon
Question: I have reviewed many recipes before making my homemade pasta. It turns out great except in all the pictures it shows the pasta coming out of the pasta maker all nicely separated. Mine comes out kind of stuck together….I have to like pull each strand apart, then throw it in some flower and lightly toss it. What am I doing wrong that it doesn’t come out nice and separated.?
Hi Helene! Thanks for the question. Usually I find that when my pasta is stuck together when coming out of the pasta machine, its due to moisture or being too wet. Sometimes you can follow the recipe to the letter however hydration levels will differ because of your flour type and or egg weight. If this happens, I usually add 1tbs of flour at a time and test a small amount in the pasta machine. The other option is what you’ve already done with the flour 🙂 I hope this helps.
Best,
Mon